Tenant AllowBlock List an Underused Feature Within Exhange Online?
| ⚠️ Before you start ⚠️ |
|---|
This blog post assumes that you have M365 E5, which grants you access to Microsoft Defender for Office 365 Plan 2. This license plan enables the maximum number of allow entries to an upper limit of 5000; the maximum number of block entries is 10000 (15000 domain and email address entries). Please see this Microsft Learn Article
| ⚠️ Before you start ⚠️ |
|---|
Introduction
In today’s fast-paced threat landscape, malicious domains can spring up and disappear within hours. Organisations need to be proactive in blocking these domains before they compromise users, data or ultimately both.
Managing Microsoft 365’s Tenant Allow/Block List manually is inefficient and error-prone unless you have a dedicated individual or team dedicated to investigating and enforcing security standards. While GitHub Actions and Linux runners offer automation options that have been a favourite lately, they face serious limitations when interacting with Exchange Online, particularly around authentication.
What is the solution? I hear you cry. After finding that GitHub Actions and Linux runners were non-starters, enter Azure Automation Accounts paired with trusty PowerShell 5.1 Runbooks. Within this combination, a System Assigned Managed Identity with appropriate permissions to authenticate. This approach is cloud-native, secure, scalable, and designed to handle M365 administrative tasks reliably.
Why Not GitHub Actions/Linux Runners?
When lab’ing up or testing different automation solutions to address a need, I often look for a solution that includes some form of free threshold. Why? Not all solutions land the first time and take some testing and figuring out to complete. What better way to summarise one over the other when they both have inclusive capacities? Let’s look at the table below!
| Feature / Requirement | Azure Automation Account | GitHub Actions | Winner |
|---|---|---|---|
| Exchange Online Support (App-Only) | ✅ Full native support on Windows-based Runbooks using PowerShell 5.1 and CertificateThumbprint. |
❌ Linux runners do not support CertificateThumbprint for Connect-ExchangeOnline. |
Azure AA |
| Windows PowerShell 5.1 Compatibility | ✅ Native, guaranteed PowerShell 5.1 environment (required for some EXO cmdlets). | ❌ GitHub runners are Linux or PowerShell Core only. | Azure AA |
| Integration with Microsoft 365 APIs & Permissions | ✅ Tight integration with Entra ID role-based access, App Registrations, and M365 scopes. | ⚠️ Requires custom configuration for Graph/EXO + no built-in directory insight. | Azure AA |
| Logging & Diagnostics | ✅ Output logs stored in Azure with options to forward to Log Analytics or Storage. | ⚠️ Logs available only in job run history; more difficult to centralise. | Azure AA |
| Cost & Billing | ⚠️ Pay-per-minute billing but very low cost for light jobs. | ✅ Free for public repos and light use, cost-effective for small-scale workflows. | GitHub |
| Ease of Deployment from DevOps | ✅ Integrates with pipelines or scripts (via az CLI, Terraform, etc.). | ✅ GitHub-native workflows are excellent for CI/CD. | Tie |
GitHub Actions struggles with the ExchangeOnlineManagement module on Linux, and certificate-based authentication isn’t available. Azure Automation, however, integrates seamlessly with Exchange Online, making it ideal for operationalising blocklist management.
For the Azure service, use the link above and look for the ‘See All Free Services’ button. However, for the purpose of this blog, you get 500 minutes of Automation Account runtime per month.
OK, Ben, get to the point…
What is the Tenant Allow/Block List?
The Tenant Allow/Block List in Microsoft Defender for Office 365 lets administrators manually override default filtering decisions by Defender or Exchange Online Protection (EOP). This helps address false positives (good emails marked as spam) and false negatives (malicious emails allowed through). The list applies during email delivery and when users click links in messages. You can block or allow specific domains, email addresses, and spoofed senders, affecting internal and external communications. Blocking a domain or address prevents users from sending emails to those destinations.
This feature is super useful, and it is underutilised for proactive defence! This blog lays out how this list could help with the good fight in the war that rages through cybersecurity.
Intelligence
The automation script leverages threat intelligence by consuming publicly maintained lists of newly registered domains, a common indicator of suspicious or malicious activity. Attackers often use freshly created domains to evade traditional filters and launch phishing, spoofing, or malware campaigns before the domains are flagged by security engines. By proactively parsing and blocking these domains from a trusted intelligence source, the script acts as an early-warning defence mechanism. It enhances Microsoft 365’s native protections by introducing timely, community-driven data into the Tenant Block List, reducing the attack surface before threats are even delivered to users.
Please welcome … Webamon
As I was perusing LinkedIn, a mutual connection had commented on a post from Webamon, which caught my attention. I like witty, smart posts and banter, as well as informative and useful posts. I started to follow the founder of Webamon, and shortly after following several posts from him about GitHub taking his repo down more so people reporting it, he posted about his Codeberg repo. Let’s open the treasure trove, the newly_registered_domains repo! So give them some love for making this intelligence for free! The following is the folder structure; as such, we are specifically interested in the ‘Monitoring Output’ folder for this blog post.
/root
  ├── new_domains.txt # Aggregated list of all newly registered domains
  ├── removed_domains.txt # Aggregated list of all removed domains
  ├── summary.json # Aggregated metadata summary
  ├── /<TLD>/
      ├── new_domains.txt # List of newly registered domains specific to the TLD
      ├── removed_domains.txt # List of removed domains specific to the TLD
      ├── summary.json # Metadata summary specific to the TLD
  ├── /monitoring_output/
      ├── /<monitored_list>/ # Directory for monitored domain lists (e.g., f500_domains)
          ├── similarity_60.txt # Domains with similarity >= 60% and < 70%
          ├── similarity_70.txt # Domains with similarity >= 70% and < 80%
          ├── similarity_80.txt # Domains with similarity >= 80% and < 90%
          ├── similarity_90.txt # Domains with similarity >= 90% and < 100%
          ├── similarity_100.txt # Domains with similarity == 100%
          ├── similarity_aggregated.txt # Aggregated results of all similarity thresholds
Now, with specific attention to the ‘similarity_90’ and ‘similarity_100’ text files, these will be the fundamental source of domains for our block list. Per the repository overview, the lists receive a daily update between 07:00 and 07:30 UTC. Depending on the number of domains added, this can take a few minutes to complete from an automation perspective.
High-Level Overview
What does this all mean? We will use these lists to proactively update the Tenant Allow/Block List with newly registered domains with a 90-100% degree of similarity to F500 Company domains. With domains similar to Tesla, Paramount, Amazon, Apple, Facebook and Salesforce, these could be used for phishing campaigns to trick your users into believing emails are from a legitimate source.
| ⚠️ |
|---|
These could be legitimate domains and not malicious in nature and you should perform your own due diligence. Exercise with caution ensuring your own/business led tolerances and acceptance of risk will still need to be considered here.
| ⚠️ |
|---|
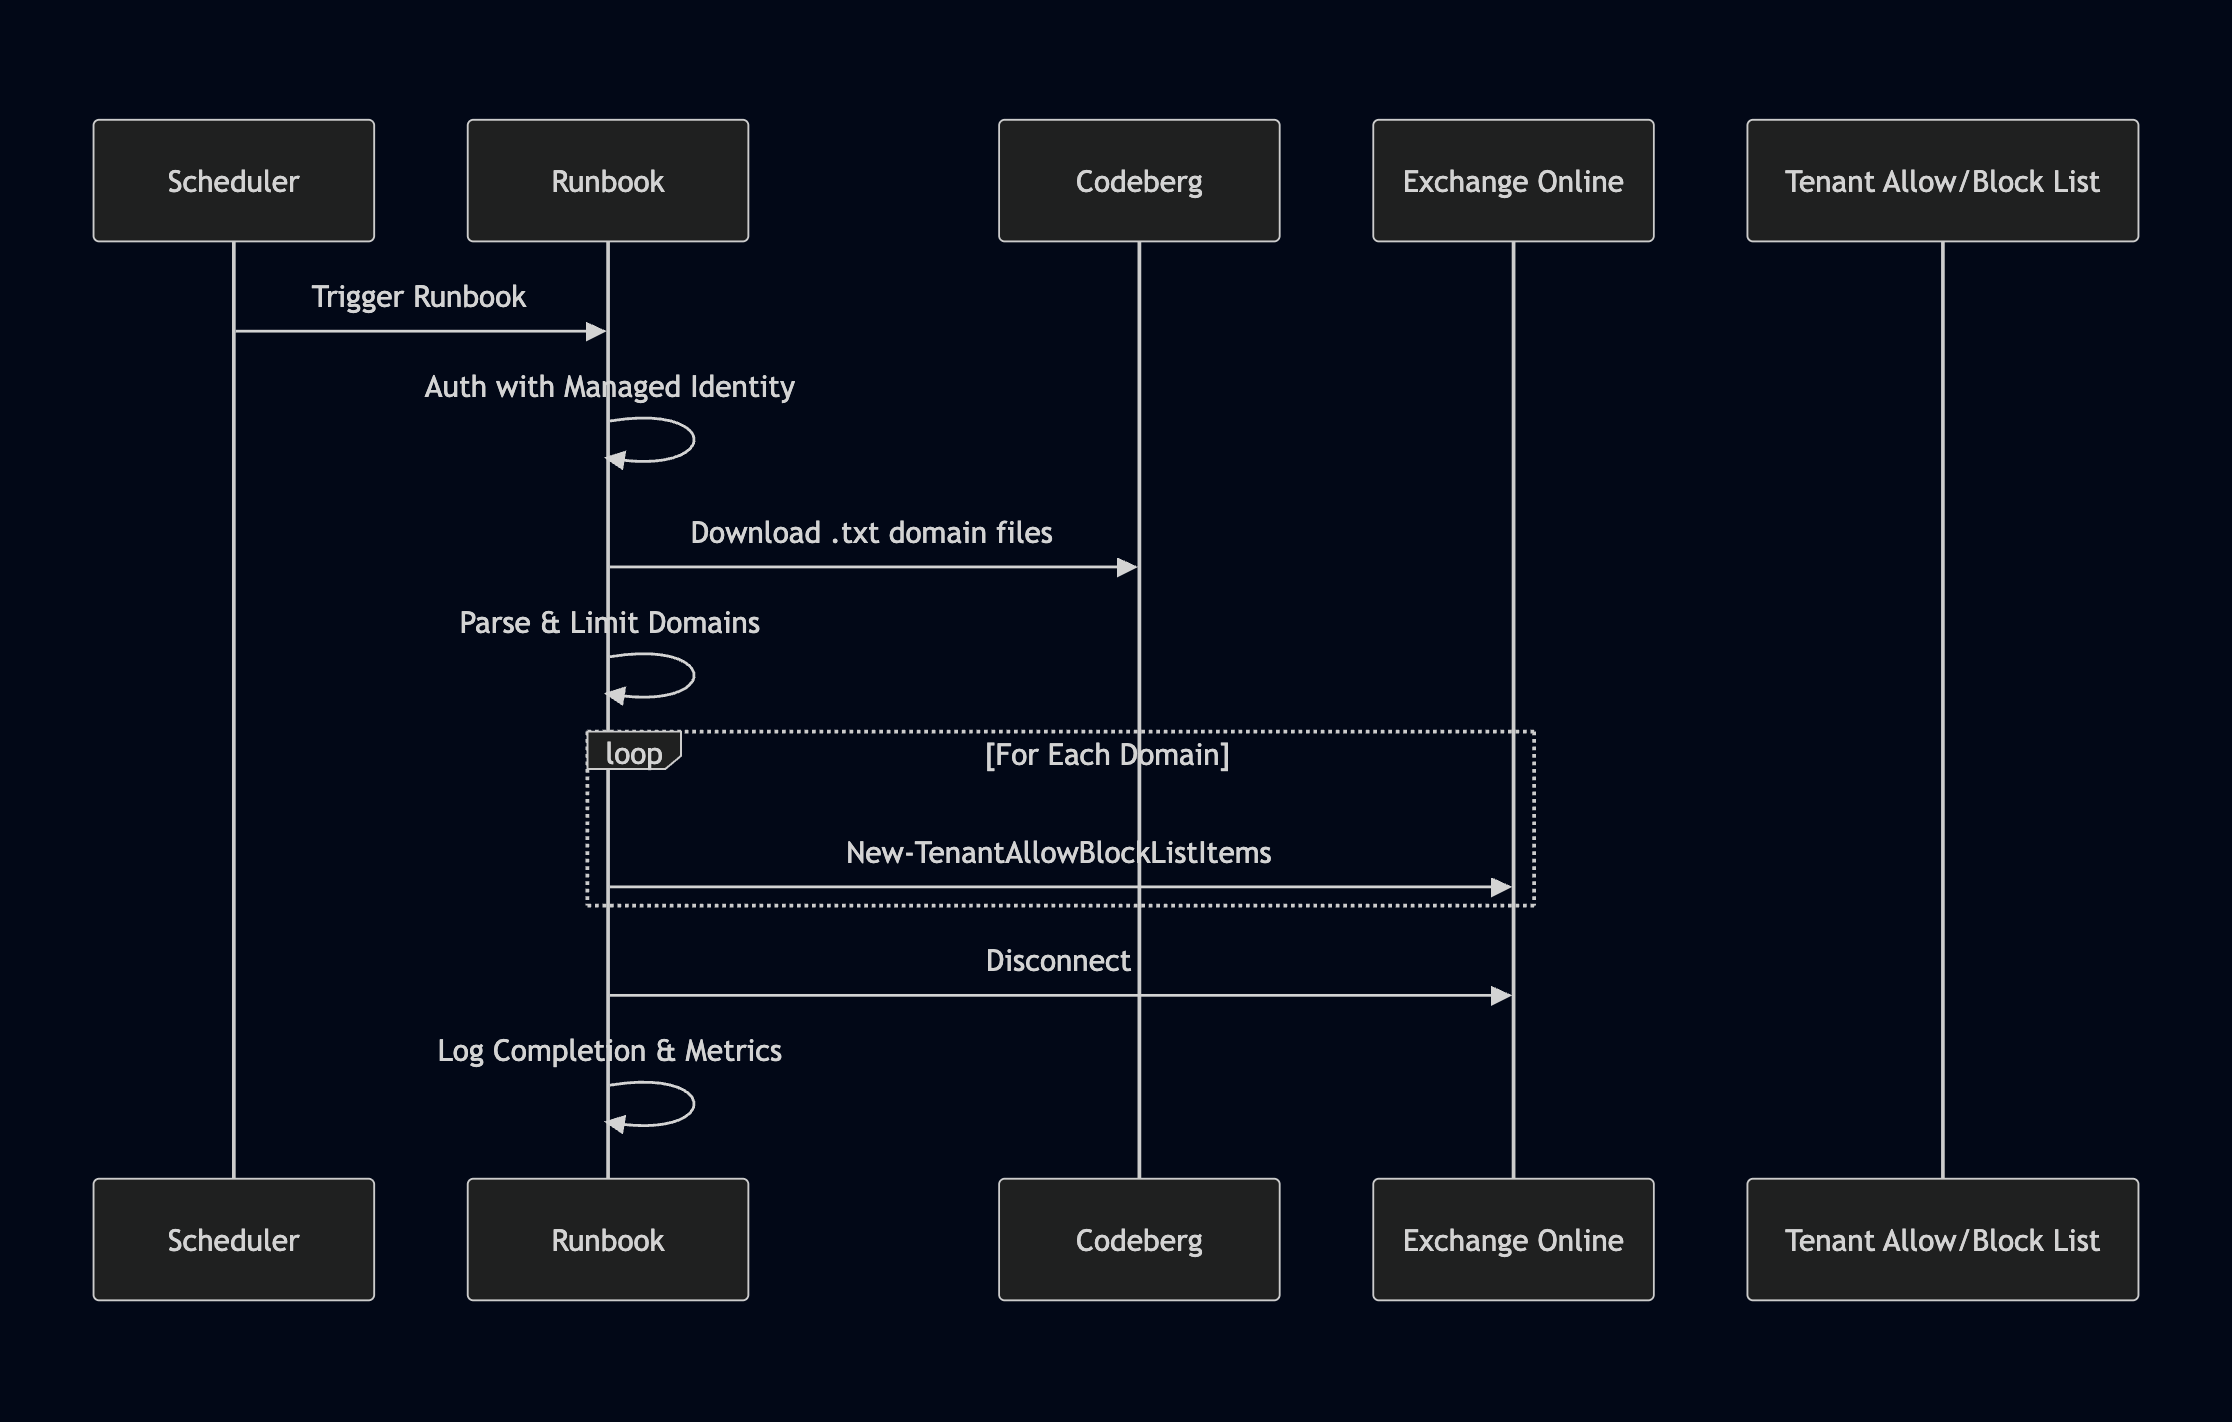
So, how does this process flow? The below diagram gives an overview of how the process, more so the script will flow within the Azure Automation Account.
With this in mind, let’s jump in!
Implementation Guide
The following steps will assume that you have basic Azure/PowerShell skills.
Prerequisites
- An active Azure subscription
- Sufficient permissions (typically Contributor or higher)
- A clearly defined naming convention for resources
- The following PowerShell Modules
- Import Package Management module
- Import PowerShellGet
- Then last but not least, import ExchangeOnlineManagement module
- PowerShell script saved in
.ps1format, you will need to copy the contents of the.ps1to the clipboard
Azure Automation Account
Create an Azure Automation Account
Step 1: Navigate to the Azure Portal
- Go to https://portal.azure.com
- Use the search bar to type “Automation Accounts”
- Click on “Automation Accounts” from the search results.
Step 2: Create a New Automation Account
- Click “+ Create” in the top left of the Automation Accounts page.
- Under Project details, select your:
- Subscription
- Resource Group (create a new one if needed)
- Enter the following under Instance Details:
- Name: Use a consistent naming scheme, e.g.,
auto-uk-prod-001 - Region: Choose the region closest to your users or services

- Name: Use a consistent naming scheme, e.g.,
- Proceed to the “Advanced” tab and ensure ‘System Assigned Identity’ is selected.

- Proceed to the ‘Networking’ tab, and for this instance ‘, Public access’ is what we want. (Want a challenge? Attempt to complete this with a private endpoint!)

- Proceed through ‘Tags’ and ‘Review & Create’.
💡 Tip: Use tags like
Environment=Prod,Owner=ITSecto help manage resources later.
The deployment will take 10–20 seconds but can take longer but you will see a completion screen once completed.
Use an existing Azure Automation Account
If you already have an Azure Automation Account then we will be using a System Assigned Managed Identity, ensure you have the details of this to hand.
Import Required PowerShell Modules
This step provides step-by-step instructions for adding PowerShell modules to an Azure Automation Account via the Azure Portal.
Step 1: Open Your Automation Account
- Navigate to https://portal.azure.com
- Search for and select Automation Accounts
- Choose your target Automation Account from the list

Step 2: Navigate to Modules Gallery
- In the left-hand menu under “Shared Resources”, whilst in your Automation Account, select Modules.
- This will load a page with all the default loaded modules for the Automation Account.

The gallery shows prebuilt and community-contributed modules available for import
Step 3: Search for the Module
- Select “+ Add Module.” This will open a page where you can begin adding the desired modules.

- Select the radio button for “Browse from gallery” and select the blue ‘Click here to browse from gallery’ link.

- Use the search bar to find the module you want to import. The modules we need are listed above; however, due to dependencies, they need to be installed in the following order:
- Package Management
- PowerShellGet
- ExchangeOnlineManagement

- Click on the module in the results list; this will take you to the module details page.

- “Select” on the next page to return to the previous menu
Step 4: Import the Module
- Returning to the “Add a module” page
- The name of the package will now be populated
- Select the runtime, which for this will be “5.1.”
- Click Import
- The module will now begin to import.

⏱️ Note: Module import may take several minutes. Refresh the Modules section under the Automation Account to monitor progress.
Complete the steps for the required modules and proceed.

Create and Upload the PowerShell 5.1 Runbook
This script performs the following:
- Authenticates using the automation account managed identity.
- Downloads malicious domain lists from the Webamon Codeberg repository repository.
- Parses and deduplicates domains.
- Adds them to Microsoft 365’s Tenant Blocklist using
New-TenantAllowBlockListItems. - Implements batching and retry logic to avoid throttling.
The PowerShell can be found on GitHub GitHub. Open the script and copy it to the clipboard, or download the .ps1 file, as we will need the code shortly. These next steps explain how to create and publish a PowerShell Runbook in Azure Automation using the Azure Portal.
Step 1: Navigate to Runbooks
- Go to https://portal.azure.com
- Open your Automation Account
- In the left menu, expand Process Automation
- Select Runbooks

Step 2: Create a New Runbook
- Click + Create a runbook
- A new blade will open with form fields to complete

Step 3: Configure Runbook Details
- Name your Runbook clearly (e.g.
Block-SuspiciousDomains) - Set:
- Runbook type:
PowerShell - Runtime version:
5.1(unless you require PowerShell 7+ features, but this script works with 5.1)
- Runbook type:
- Optionally, add a description and tags if you wish.
Click Review + Create, then confirm.

Step 4: Add and Publish Script
- Paste the
.ps1script content into the editor - Click Save
- Click Publish
💡 Note: Once published, the Runbook is ready for scheduling or manual execution.

You must Publish a Runbook before it can be run or linked to a schedule.
Managed Identity & Permissions
Now for all of this to work and like anything we need to authenticate against the service. Now there are several ways to do this and for ease I prefer to do this in the Azure Cloud Shell, you can switch from Bash to PowerShell and vice versa. Head over to the Azure Portal to start.
- Launch a Cloud Shell by selecting the PowerShell icon.

- Once the Cloud Shell has been initialised, we can begin running the following commands in order.
- The 1st line installs the Microsoft Graph Cmdlets.
- The 2nd line declares a variable we want to store.
- The 3rd line connects to the Microsoft Graph.
- The 4th line gets the service princpal of Exchange Online; if it returns a value, then the Exchange Online resource is available.
- 5th line grants Exchange.ManageAsApp API permission.
- The 6th line gets the Id (GUID) value of the Office 365 Exchange Online resource in Microsoft Entra ID.
- The 7th line finally executes the command to assign the permission to the managed identity.
Don’t forget to replace the display name of your Automation Account in the second line!
#Line 1
Install-Module Microsoft.Graph -Scope CurrentUser -Repository PSGallery -Force

#Line 2
$MI_ID = (Get-AzADServicePrincipal -DisplayName "aauksotabl02”).Id

#Line 3
Connect-MgGraph -Scopes AppRoleAssignment.ReadWrite.All,Application.Read.All

#Line 4
Get-MgServicePrincipal -Filter "AppId eq '00000002-0000-0ff1-ce00-000000000000'"

#Line 5
$AppRoleID = "dc50a0fb-09a3-484d-be87-e023b12c6440"

#Line 6
$ResourceID = (Get-MgServicePrincipal -Filter "AppId eq '00000002-0000-0ff1-ce00-000000000000'").Id

#Line 7
New-MgServicePrincipalAppRoleAssignment -ServicePrincipalId $MI_ID -PrincipalId $MI_ID -AppRoleId $AppRoleID -ResourceId $ResourceID
If you need further assistance, use this Microsoft Learn article for details or reach out!
You may also need to confirm the shell authentication by using a device code flow depending on your security settings.
Entra ID Role Permissions
As we are performing certain actions with this managed identity, we need to assign some additional permissions. Now for this example you will see I have used ‘Exchange Administrator’ to assigned against the managed identity now, this is because I had sporadic results with ‘Security Administrator’. I could have been fighting against propagation time for the permissions ecetera so I would implore you to use the least priveldge as possible, you may consider a custom role to further reduce risk.
- Go to https://portal.azure.com
- Open ‘Microsoft Entra roles and administrators’.

- In the search box, enter ‘Exchange Administrator’ or ‘Exchange’ to locate the role and select it.
- Select ‘Add assignments’
- Under the membership options, find the managed identity; if you created it when you deployed the Azure Automation Account, then it will be the same name as this.
- Select ‘Add’ and confirm any further boxes.
If you need further guidance on this segment also you can read the content on this Microsoft Learn article which links you directly to the section you need.
Schedule the Runbook
I have purposefully left this bit until last to make sure all the required permissions are completed, didnt want this executing in the background and failing. Go back into your Automation Account from earlier and follow the below to setup your schedule.
- In the Automation Account, navigate to your Runbook.

- Click Schedules → Add a Schedule.

- Configure it to run daily or as often as needed based on threat intelligence frequency.

You can either wait for the schedule to run the script or manually execute it to confirm it works.
Tenant Allow/Block List Limits
- Maximum Entries: Each organization can have up to 1,000 entries in the Tenant Allow/Block List.
- Entry Types: Email addresses, Domains, and Spoofed senders.
- Behavior:
- Emails from blocked senders are marked as high-confidence spam (SCL = 9).
- Users are prevented from sending to blocked addresses/domains.
- Send attempts to generate a non-delivery report (NDR):
``` 550 5.7.703 Your message can't be delivered because messages to XXX, YYY are blocked by your organisation using Tenant Allow Block List.
- Scope: Enforcement applies across all internal and external recipients.
Conclusion
By implementing this automation with Azure Automation Accounts, you’re not just keeping pace with the threat landscape; you’re staying ahead of it. This solution improves operational efficiency, reduces manual error, and ensures your Microsoft 365 environment remains protected against malicious domains using a repeatable, scalable, and secure approach.