GitHub Actions Running Entra Authentication Methods Report
In this post, we are going to look at automating the generation of a PowerShell report from Daniel Bradly.
Keeping track of authentication trends in Microsoft Entra ID is essential for monitoring security posture, identifying anomalies, and ensuring compliance. Whether to help with adoption or as part of a project to simplify this process, Daniel Bradley LinkedIn has written an awesome PowerShell script to help.
Daniel has done an 🍬 sweeeeeeeeet 🍬 job with the script on requiring one external module dependency and the HTML report is 🔥. I saw this and I have been playing around with Maester recently, I thought wouldn’t it be cool to automate Daniels’s report so that there could be a historic record over time or throughout a project?
Enter GitHub Actions!
This guide will walk you through setting it all up in GitHub. Ben, why GitHub & GitHub Actions? Well other than its handy to have source control it might also have something to do with the 2000 free minutes per month for your GitHub Actions.
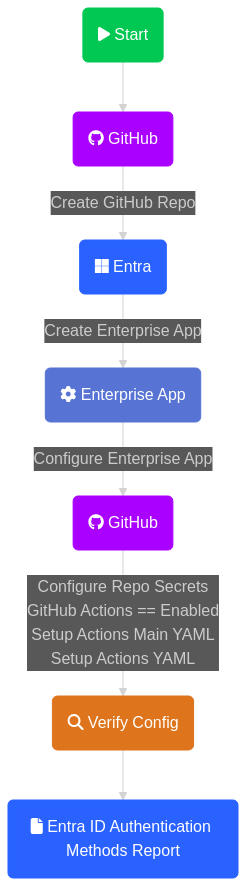
High-level run-through of steps.
GitHub
Create a GitHub Repo, if you need help see this article: GitHub.
Entra
Sign in to your M365 Tenant with appropriate permissions to create an Enterprise Application.
As I said earlier, I’ve been using Maester so there is an excellent guide on how to configure GitHub Actions using Workload Identity Federation, the link to the article is here Set up the GitHub Actions Workflow. Please go check Maester out and be sure to thank the team over there for their clear documentation.
⚠️ you will need to change some values from their documentation to suit this! ⚠️
You will need to change:
- Name of the Enterprise App
- Permissions granted to Microsoft Graph1
- Federated credentials to match your setup, similar to the Maester documentation states.
The permissions1 needed to perform the reporting element are detailed in Daniel’s script but for the purpose of following along you need:
- AuditLog.Read.All
- Organization.Read.All
- Policy.Read.All
- RoleAssignmentSchedule.Read.Directory
- RoleEligibilitySchedule.Read.Directory
- RoleManagement.Read.All2
- UserAuthenticationMethod.Read.All
You can ignore the Exchange Online & Azure RBAC permissions.
GitHub…again
If you are following along you will have recognised that we are following the same steps as the Maester documentation and are now back in GitHub.
GitHub Secrets
Open your GitHub repo and follow the steps outlined here: GitHub Docs or Maester Docs.
You will need two secrets:
- AZURE_TENANT_ID
- AZURE_CLIENT_ID
If you still have the app registration page open from creating the Enterprise App earlier or not, I would recommend finding the Enterprise App within the ‘Enterprise Apps’ menu option in Entra ID.
Use the following table to map the secret name to the value needed:
| GitHub Secret Name | Entra Enterprise App Field | |
|---|---|---|
| AZURE_TENANT_ID | Directory (tenant) ID | |
| AZURE_CLIENT_ID | Application (client) ID |
GitHub Actions
You may at this point also check that GitHub Actions are enabled. In my experience, this is enabled by default however once in the repo, go to Settings. From here:
- Select Actions > General > Actions permissions
- Select Allow all actions
- Select Save
We have configured everything we need so far for basic repo, identity and permissions we can start building out the solution. Within your repository, head over to Actions. This is where we are going to build out our workflow, it should look something similar to the one below and select set up a workflow yourself.
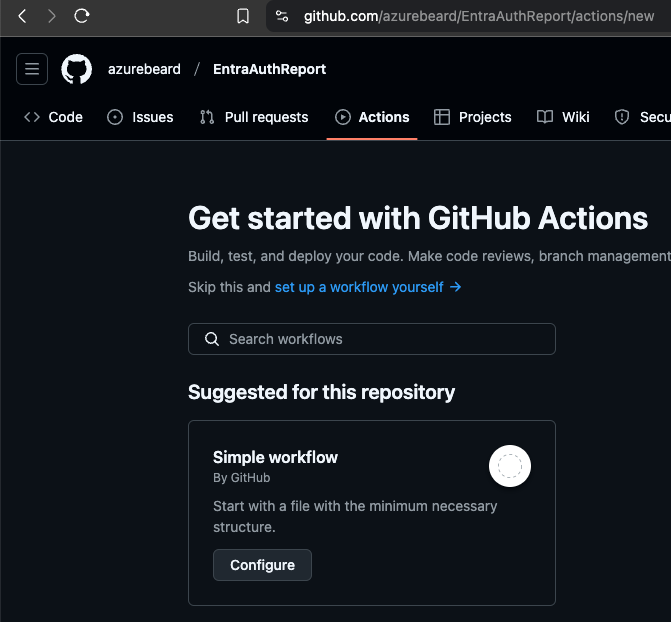
This will open a blank file, called main.yml in the main branch, change it if you see fit or leave it as it is. Copy the Main YAML listed below.
Main YAML
name: User Authentication Methods Report

on:
  push:
    branches: ["main"]
  # Run once a week at midnight on a Monday
  schedule:
 - cron: "0 0 * * 1"
  # Allows to run this workflow manually from the Actions tab
  workflow_dispatch:

permissions:
      id-token: write
      contents: read
      checks: write

jobs:
  run-auth-report:
    name: Run Auth Report
    runs-on: ubuntu-latest

    steps:
 - name: Checkout Action
      uses: actions/checkout@v4

 - name: run authrep action
      uses: ./action
      with:
        client_id: ${{ secrets.AZURE_CLIENT_ID }}
        tenant_id: ${{ secrets.AZURE_TENANT_ID }}
This YAML file will execute on a commit to the main branch, once a week on a Monday at midnight and manually from the Actions tab within your repo.
If you are new to cron jobs and want to change the schedule, this handy little editor will get you going.
Select the green button Commit changes…, fill in the commit message and Commit. This will create your workflow.
Repo Layout
Go back to the Code section of your repo, you may see a README.md file which will have been created when you initialised your repo if you selected this option. Additionally, you will now see a .github/workflows folder and this is where your main.yml file is stored, if you want to go back and edit the time the scheduled action runs etc.
We are going to create the remaining items needed to get this script up and running. Once again if you are confident in changing the layout, by all means, change it to suit your needs. You will need to change certain files to reflect those changes and where possible I will make comments to highlight these changes.
This is the repo layout I am using for this post.
├── repo
│   ├── .github/workflows
│   │   ├── main.yml
│   ├── action
│   │   ├── action.yml
│   │   ├── Invoke-EntraAuthReport.ps1
│   ├── README.md
PowerShell Script This is now the good bit! The script that Daniel has created is awesome but needs a few tweaks to get it to run on a Linux runner for GitHub Actions. You can grab a copy of the slightly amended version of the script from my GitHub, much hasn’t changed but for those interested:
- Additional module to authenticate as an application
- Some path updates (so the report is available after the Action has run)
- Stop the report opening in the browser (this will be running headless and not required)
- Some formatting updates to the HTML (this is due to the way the Linux runner interprets new lines/returns differently than Windows, I suspect)
As documented above place this script within the action folder you created in the repo.
Action YAML This YAML file is called from the main.yml file and does the heavy lifting but the main features are running the script and uploading the output so the report is available. Where possible I have tried to be as descriptive as possible but always welcome feedback.
name: “Authentication Report Action"
description: "The action YAML file that logs in and generates the Entra Authentication Methods Report."
inputs:
  tenant_id:
    description: "Entra ID Tenant ID"
    required: true
  client_id:
    description: "App Registration Client ID"
    required: true

runs:
  using: "composite"
  steps:
 - name: Sign in to Entra ID
      uses: azure/login@v2
      with:
        client-id: ${{ inputs.client_id }}
        tenant-id: ${{ inputs.tenant_id }}
        allow-no-subscriptions: true
        enable-AzPSSession: true

 - name: Checkout Script
      uses: actions/checkout@v4

 - name: Run Entra Auth Report
      shell: pwsh
      run: |
 pwsh .\action\Invoke-EntraAuthReport.ps1 -TenantId '${{ inputs.tenant_id}}' -ClientId '${{ inputs.client_id }}' `

 - name: Authentication Report
      uses: actions/upload-artifact@v4
      with:
        name: Entra Authentication Methods Report
        path: ./Entra_Authentication_Methods_Report.html
        include-hidden-files: false
Verify Configuration
Let’s check everything is in order before testing.
- GitHub Repo
- Enterprise App
- Configured the Enterprise App
- GitHub Repo Secrets
- GitHub Actions Enabled
- GitHub Repo Layout
- GitHub Main & Action YAML
If you have not already executed your action, this will be completed on schedule normally however open the Actions tab within your GitHub repo. Select User Authentication Methods Report from the left pane, and select Run workflow from the drop-down menu before finally selecting the Run workflow button to start. This will generate a running workflow where you can monitor it executing. If you need further help refer to the GitHub Docs page here.
Wrap Up
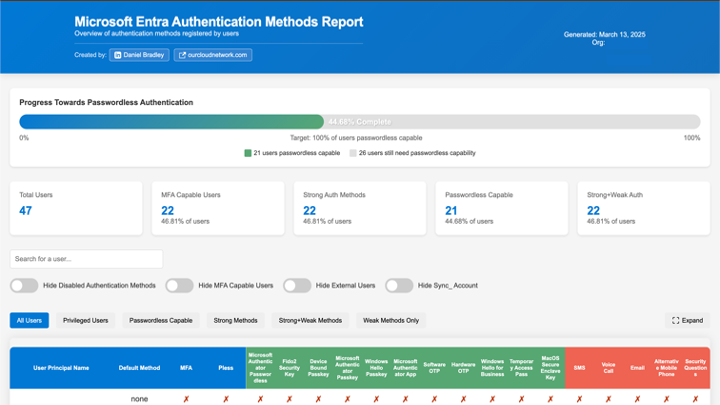
If setup correctly your workflow will complete and you should find the report attached to the completed workflow, download and open it to enjoy your automated report.
It’s been a while since I’ve written a blog post so let me know what you think and hopefully, this is the first of many to come this year.